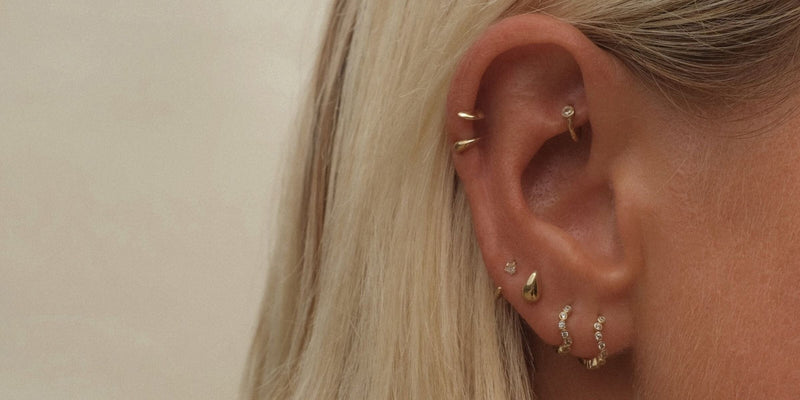
Conch piercing guide: placement, hoops and the right size


Where your conch sits, what to start with and when the hoop can come in, plus the measurements that get the fit right.
A conch piercing sits in the bowl of cartilage at the center of your ear. One tiny diamond looks incredible there. So does a hoop wrapping around the outside of your ear. My advice? Start with the stud. Save the hoop for once it's healed.
I have 18 ear piercings, and my conch is one of my favorite placements. I'm a side sleeper, and once healed, it's been one of my most comfortable too. For me, the trick is a smooth front, the right post length and a little planning before you're pierced.
Here's what I'd ask at the appointment, what I'd start with and what I'd wear once it's healed.
The short answer
- Placement: the bowl of cartilage at the center of your ear.
- Starting jewelry: a small, smooth flat back stud, with enough post length for swelling, fitted by your piercer.
- Gauge: I personally prefer 18G, but the right gauge depends on your piercing and chosen jewelry. Check each product's specifications.
- Post lengths: 5 mm to 6.5 mm for a healed conch. New or still-healing: 8 mm, to allow for swelling.
- Hoop diameter: 10 mm and 12 mm are examples, not sizes that fit every conch. Have your piercer measure the fit.
- Switching to a hoop: once your conch is fully healed and your piercer has confirmed it's ready. Downsizing a post during healing is a separate change.
Inner conch or outer conch: where would yours go?
The inner conch is the cupped part beside your ear canal. If you're picturing a tiny diamond in the middle of your ear, this is probably the placement you mean. It can also suit a hoop running around the outside edge of the ear.
An outer conch sits higher and farther out, on the flatter cartilage toward the rim. It overlaps with what some studios call a flat piercing, so don't get too caught up in the name. Show your piercer a photo and have them mark the exact spot.
If your goal is a hoop, say so before they mark it. The position and angle of the piercing affect the diameter you'll need later. Plan for the look you want, even if you aren't going to wear it straight away.
Before you're pierced
Bring your everyday things
Your earbuds, over-ear headphones and glasses all deserve a place in this conversation. Bring them to the appointment so your piercer can check where they sit against the proposed placement.
A conch can sit close to where an earbud rests. Planning around that now is much easier than finding out afterwards that your favorite headphones press on your new piercing.
Does it hurt?
It's a needle through cartilage, so yes, you'll feel it. How much is personal. I wouldn't let someone else's score out of ten make the decision for you.
I'd spend more time talking about how the placement fits your life: your headphones, your pillow and the jewelry you'd eventually like to wear.
Ask about gauge
I personally prefer 18G. It's what I wear, and I find the thinner post feels more comfortable in my piercing, with less pressure. That doesn't mean thinner is better for every ear. Ask your piercer what suits your anatomy and placement.
An 18G post is approximately 1.0 mm thick; 16G is approximately 1.2 mm. Most of our flat back posts are 18G, while some of our conch-suitable clickers are 16G. Always check the gauge of the specific piece you're buying.
If you already know which earring you'd eventually like, show your piercer before you're pierced. And don't force a thicker piece through a smaller piercing later.
Start with a flat back
My choice for a fresh conch is a small, smooth flat back stud. A bezel-set stone or polished ball keeps the profile simple, without sharp edges or a large front catching on things.
Your piercer needs to choose a post with enough room for swelling. Our size guide recommends 8 mm for a new or still-healing conch. Your piercer will confirm the length for your anatomy.
Rebecca W. brought two lengths to her appointment: “I brought a 6.5mm and this 8mm and he chose to give me the 8mm, and it's perfect!”
That's one customer's fit. Let your own ear have the final say.
Downsizing isn't the same as switching to a hoop
A fresh piercing needs room for swelling. Once that swelling settles, your piercer may recommend a shorter post before the piercing is fully healed. That's downsizing.
An unnecessarily long post can catch and move around. A post that's too short can press into your ear. The aim is a comfortable fit for the stage your piercing is at.
Have your piercer handle changes during healing. Switching to a hoop comes later, once the piercing is fully healed and they've checked that the hoop suits it. Looking calm on the outside isn't the same as being healed inside.
What to wear in a healed conch
The single diamond
One tiny diamond can be enough. It puts a little light right in the center of your ear without making the whole stack feel busy.
For a conch, I love a bezel or another smooth setting. There are fewer little spaces to clean around, and the front sits neatly in the bowl of your ear. The size still needs to work with the space you have.
The pear or marquise
I like how a pear or marquise follows the curve of the ear. It gives you a different shape to work with, especially if you already have round diamonds in your lobes.
Think about the direction the stone will sit, as well as its size. A shaped front should fit comfortably within the bowl, rather than press against the surrounding cartilage.

The contour front
A curved front can follow the natural line of your conch, like a soft crescent moon. It fills more of the space without needing another piercing.
Escha is one of our contour examples. This is the direction I'd look in when a single stone feels too little and a hoop feels like too much. Check both the front's dimensions and the post length, because a beautiful shape still needs to fit your ear.

The hoop
A conch hoop frames the outside of your ear and can become the piece that leads the whole stack.
The fit is the important part. It needs to clear the edge of your ear without pulling, pressing or changing the angle of the piercing. A hoop that's too small isn't a closer fit worth putting up with.
Have your piercer check your first hoop, including its wire thickness and inner diameter.
What size conch earring do you need?
There are three measurements to understand. They answer different questions.
Gauge: how thick is it?
Gauge is the thickness of the post or the part of the hoop that passes through your piercing. Check it on the exact product, including clickers.
If you change from thicker to thinner jewelry, the piercing may settle around that size over time. Talk to your piercer if you're planning to move between gauges.
Post length: how much room does your ear need?
This is the wearable bar between the inside of the flat back and the base of the decorative front. Don't include either end in the measurement.
Our size guide recommends 5 mm to 6.5 mm for a healed conch and 8 mm for a new or still-healing one. Within that, choose the length that fits your ear.
Size recommendations are a guide only. Fit depends on your piercing placement, healing stage, aesthetic preference and ear anatomy (e.g. lobe and cartilage thickness). Contact customercare@adornmonde.com for assistance or consult your local piercer.
The front should sit comfortably without squeezing, and there shouldn't be unnecessary extra length catching behind your ear. If either end starts digging in, or a settled piercing becomes swollen, have the fit checked.
Hoop inner diameter: will it clear the rim?
Measure across the inside of the ring. The outside width and the diamond size are different measurements.
A 10 mm hoop may fit one conch perfectly, while another needs 12 mm or a different size. The position, angle and shape of your ear all matter.
Maria M. found 12 mm a little big and settled on 10 mm, “and it fit my conch piercing perfectly.” Julia P. went the other way: “Got the 12 mm for my conch and it's perfect!”
Same idea, different ears. Have your piercer measure the fit before buying.
Save your measurements
Once you've found your fit, write down the gauge, post length or hoop diameter, and placement in your phone.
“Conch: 6.5 mm post” is much more useful than “I think I wear medium.” Add the front size too if you've found one you love.
What your conch earrings should be made of
You can be pierced in solid gold. Suitable solid 14k or 18k gold needs to be nickel- and cadmium-free, alloyed for biocompatibility, and properly finished. Implant-grade titanium, such as ASTM F136, is another option.
The exact piece matters: the surface, setting, construction, size and appropriate sterilization all need to suit a fresh piercing. A “hypoallergenic” label alone doesn't tell you enough.
Our solid 14k gold flat backs have gold throughout, rather than a thin gold coating over another base metal. Gold-plated, gold-filled and vermeil jewelry aren't suitable choices for a fresh piercing.
If your ears react to particular metals, check the alloy as well as the gold content. Our guide to earrings for sensitive ears explains what to look for.
Earbuds and sleeping with a conch
Earbuds
A small, low-profile front may leave more room for an earbud, but it depends on your ear and the earbud itself. Even with careful placement planning, you need to check how they sit together.
While it's healing, avoid earbuds or headphones that press on or rub the piercing. Once healed, if an earbud makes it sore, don't keep pushing it into place.
Sleeping
I'm a side sleeper, and my healed conch is one of my most comfortable placements. It sits tucked into the bowl of my ear, so a small, smooth front works well for me. The post length and the shape of the front still matter.
While it's healing, keep pressure off it. A piercing pillow can help you rest with your ear in the opening rather than pressed into the pillow.
Once healed, a flat back still isn't a promise that every design will feel comfortable to sleep on. If it hurts, check the fit and the front instead of pushing through it.
How to change a conch earring
Your piercer should handle jewelry changes during healing and help fit your first hoop. These steps are for an internally threaded flat back in a fully healed piercing.
- Wash and dry your hands. Start with clean jewelry, a clean, compatible taper and a closed sink drain.
- Gently pass the taper through your piercing from the front.
- Behind your ear, fit the taper tip into the open end of the flat back post.
- Keep them connected and guide the post through as the taper comes out at the front.
- Remove the taper, hold the flat back steady, and screw on the decorative front until snug.
Right is tight. Left is loose. Just remember you're looking at the front of the earring.
If the taper or post meets resistance, stop. Don't force it. If the front doesn't screw in smoothly, back it off and line it up again.
Our 2-piece taper set includes straight and curved guides. Use a compatible guide and the shape that gives you the easiest access. The Lazy Girl Jewelry® Kit brings the little helpers together, and our flat back earrings guide walks through the process in full.
Keep it secure
With clean, dry hands, hold the flat back steady and gently check that the front is snug. Don't overtighten it or rotate the whole post through a healing piercing. Ask your piercer to show you how to check the fastening.
For a clicker, check that the hinged section is fully seated and secure. Follow the instructions for that specific design.
Looking after it
You still need to clean it. Obviously.
While it's healing, follow your piercer's instructions. Use sterile saline wound wash, leave the jewelry alone and avoid pressure. Don't twist it, pick at it or keep removing it to check it.
If pain, heat or swelling is increasing, or you suspect an infection, get medical advice. Don't assume a different earring will solve it.
Styling your conch
One well-chosen diamond in the middle of the ear can do more than three earrings competing for attention. When the conch is leading, I like to keep the main lobe a little quieter.
A pear or marquise can connect the shapes in your stack. A contour front can follow the curve. A hoop can frame the whole ear. You don't need all three to make the placement work.


Get the placement mapped, let it heal, find your fit, then decide which direction feels like you. Our Ear Architect styling guides show how the conch can work with the rest of your ear.
The
FAQs
What's the difference between an inner and outer conch?
An inner conch sits in the cupped bowl beside the ear canal. An outer conch sits higher and farther out, toward the flatter cartilage near the rim. Names vary between studios, so have your piercer mark the exact spot.
When can I change my conch to a hoop?
Once it's fully healed and your piercer has confirmed it's ready. Downsizing a post during healing is a separate change, handled by your piercer.
What size hoop fits a conch?
There isn't one diameter for every ear. Some suit 10 mm, others 12 mm or a different size. Check the wire thickness too, and have your piercer measure the fit.
What post length do I need?
As a guide, a healed conch starts at 5 mm to 6.5 mm, and a new or still-healing one takes 8 mm. Your piercer can measure the fit.
Is 16G or 18G better for a conch?
Both are used. I personally prefer 18G, but the right gauge depends on your anatomy, placement and chosen jewelry. Some of our conch-suitable clickers are 16G, so check the exact product before buying.
Can you sleep on a conch piercing?
Keep pressure off it while it's healing. My healed conch is one of my most comfortable placements as a side sleeper, but your jewelry still needs to fit, with a front that doesn't press into your ear.
Can you wear AirPods with a conch piercing?
It depends on your placement, jewelry and how the earbud sits. Bring your earbuds to the appointment to help plan the placement, and avoid wearing anything that presses on a healing piercing.